Monday, May 31, 2010

Monday with Marcia Lowry--Racist Sheep?

I think I see the culprit...Mama Olive.

Who could NOT love a face like this....her OWN mother that's who! For the second time in her 3 year lambing career, mom "Olive" has rejected one of her babies. Olive is all black ...with some silver showing, as she ages.

The first year she had twins, one black, one white. She tried to beat the white lamb into the ground just minutes after he was born, but loved up on the black one. So we bottle raised "Charlie" that year - feeding him milk replacer (very costly) 4 times daily for two months...a major commitment. I thought maybe Olive's issue was having two to care for, but
the next year, Olive had two black babies and loved them both.

This year, she had twins again - a black and a white and once again beat up on the white baby lamb? So now, we are bottle feeding "Mandy" and Olive is SOL down the road.

And on that note...here's a favorite recipe for lamb,or it maybe mutton this time around!

Potato and Lamb Moussaka

Ingredients

  • Cooking spray
  • 2 pounds peeled baking potato, cut into 1/4-inch-thick slices
  • 1 cup chopped onion (about 1 medium)
  • 2 garlic cloves, chopped
  • 1 pound ground lamb
  • 1/2 cup chopped green bell pepper
  • 1/2 cup chopped red bell pepper
  • 1 cup no-salt-added tomato sauce
  • 1 teaspoon salt
  • 1 teaspoon ground cumin
  • 1/2 teaspoon freshly ground black pepper
  • 1/4 teaspoon ground cinnamon
  • 1/2 cup finely chopped fresh flat-leaf parsley
  • 1 cup 1% low-fat milk
  • 2 large eggs, lightly beaten

Preparation

1. Heat a large nonstick skillet over medium heat. Coat pan with cooking spray. Add one-third of potato slices to pan; cook 3 minutes on each side or until lightly browned. Transfer potato to bowl. Repeat procedure with cooking spray and remaining potato slices.

2. Preheat oven to 350°.

3. Recoat pan with cooking spray. Add onion, garlic, and lamb to pan; cook 3 minutes or until lamb begins to brown. Add bell peppers, tomato sauce, salt, cumin, black pepper, cinnamon, and parsley; cook 10 minutes.

4. Arrange half of potato slices in a 13 x 9–inch baking dish coated with cooking spray. Arrange lamb mixture over potatoes; top with remaining potato slices. Combine milk and eggs in a small bowl; pour over potato mixture. Bake at 350° for 30 minutes or until top is golden and set. Remove from oven; let stand 10 minutes before serving.


Sunday, May 30, 2010

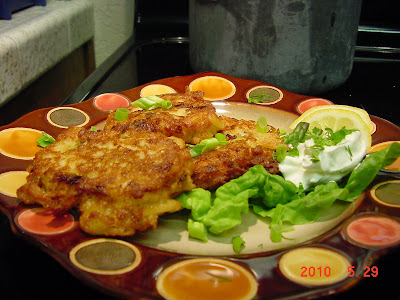
Sundays with Marlena Spieler-Cottage Cheese and Matzo Meal Latkes with Preserved Meyer Lemons


According to Jewish Cooking and Marlena, cheese latkes were once thought to be one of the most revered foods in Russia. We loved this..it was a perfect snack to go with our movie today. The tang of the cottage cheese along with the diced preserved meyer lemons made this a very spring-like dish. I used some Greek-style yogurt with a touch of dill for a perfect dip. Zchug would be great with it as well..or even harissa.

Ingredients: makes about 20 small latkes

1 and 1/4 cups cottage cheese (2% is okay)
3 eggs, separated
1 tsp salt
2 cups matzo meal
3-5 spring onions...save some green for garnish
1/2 tsp sugar
3 tbsp plain yogurt or just water ( I used water)
vegetable oil for shallow frying
Ground black pepper..about 1/2 to 1 tsp.
1/2 tsp fresh or dried dill to put in yogurt if you use it.
1/4 preserved meyer lemon..dice the skin into very small pieces.

For dip, use plain greek-style yogurt, *zshug, or even *harissa (recipes to follow)

1. In bowl, mash the cottage cheese. Mix in the egg yolks only, add half the salt, all of the matzo meal, onion, yogurt or water, lemon dice and then the pepper. If it feels too wet, add a touch more matzo meal.

2. Whisk the egg whites until they make a peak...all white and frothy. Gently fold in 1/3 of the whites to the mixture...and then gently fold in the remainder of the egg whites.

3. Heat the oil in a heavy bottomed skillet...about 1/4 inch deep. When a tiny piece of bread browns quickly, it is time to make the latkes. With a tsp, dip out a scoop of the mixture and put it in the pan. Smash down lightly. Cook until golden brown and then carefully turn over. Do the same on the other side. Drain on paper plate or paper towels and then put on serving plate. Don't over-crowd the frying pan.

Best served hot but you can keep them warm briefly in the oven until the others are done. You want them crisp on the outside and tender on the inside.

*Zchug--Yemenite Condiment

Ingredients

Directions

  1. Puree garlic and chiles in food processor, add water if needed.
  2. Add cilantro, then salt, pepper to taste and cumin.
  3. Remove mixture and set aside.
  4. Puree tomatoes in processor then combine the two mixtures

*Harissa

Ingredients:  serves 4 - 6

  • 10 dried red chili peppers
  • 3-4 cloves garlic, minced
  • 1/2 teaspoon salt
  • 2 tablespoons olive oil
  • 1 teaspoon ground coriander
  • 1 teaspoon ground caraway seeds
  • 1/2 teaspoon cumin
  • 3 TB paprika
  • 1 cup veggie stock or pepper water
  • 1/2 fresh squeezed lemon
  • Cilantro leaves for garnish

Preparation:

Soak the dried chilies in hot water for at least 30 minutes. When you drain, discard seeds and stems. Save water for processing or use veggie stock.

In a food processor combine chili peppers, garlic, salt, pepper water, olive oil. Blend together.

Add remaining spices and blend until a paste forms..add lemon juice last. Can drizzle olive oil on top and add cilantro for garnish if serving.

Store in airtight container. Drizzle a small amount of olive oil on top to keep fresh. Will keep for a month in the refrigerator. (we like the really HOT harissa)

I am fairly sure that Eileen over at Just the Two of Us is putting her last Jewish Cooking post up this Sunday...and am not sure if Shankari is finished yet. Go check it out. I have 4 more and will get those done within the next 10 days...and we shall celebrate some time this summer. Maybe Marlena will join us all once again! BTW, today in the SF Chronicle check out her Roving Feast article!!

Wednesday, May 26, 2010

Want Some All-Clad?? Memorial Day Contest!

I am giving away a brand new 12 inch all-clad pan with lid...$179.00 value!
I love my all-clad cookware..it is the best. My saucier pan is the bomb.
My all-clad dutch oven is used often. The craftsmanship is awesome.

For more info about All Clad Cookware go here and read about it. Most serious cooks already know about All Clad...it ain't cheap! A full set would cost many bucks. Glad I didn't buy mine! Thanks Bill and Joyce! Actually, they bought it for Dave before we ever met..but it was so pretty he couldn't bring himself to use it. He used to store them in the roll-around dishwasher so the other pots and pans wouldn't beat them up. Once I moved in, their luxurious life ended!

How to win? Post this giveaway on your blog if you have a blog...include this blog address please. If you don't have a blog, send emails to at least 5 of your friends and send them over here to enter. Have them tell me who sent them...first name only. Next, leave a comment about why you really want an All-Clad pan...how it will enhance you life. Be clever..even humorous. A panel of 4 people will choose the winner! You have until Memorial Day..May 31st at noon to get your comments in.

I do this in honor of everyone who has passed away in my family..and in yours- as well as all of the soldiers who died. Some give flowers....I give cookware.

All Clad pan give-away courtesy of Cooking Schmooking....no problem. (Thanks for the idea Margaret!) I bought the pan...it isn't a used one sitting in the cupboard. Ha! Although sending a used pan would be kinda funny.

It will arrive in it's own packaging... within 4 weeks, after the contest ends. I will send the pan anywhere....unless sending it costs more than the pan costs! Make sure you check back within 3 days after the contest is over to see if you are the winner. If you don't claim your prize by commenting, "I won I won" or something like that by June 3rd, the pan goes to the runner-up.

Pots and Pans Give-Away!

Go over here to enter! I am going over right now.

Sunday, May 23, 2010

Monday with Marcia Lowry-Buttercrafting or Molly McButter


Is it butter yet?
Molly...A Happy Wyoming Cow


So happy to introduce you to Marcia Lowry, my high school buddy from Wyoming. She'll be sharing ranch life with us...she lives way off the grid...and I don't mean the burbs! You can see her "back yard pond". Please enjoy today's offering from Marcia. I am so happy to welcome her to Cooking Schmooking, no problem......on food. on life.

Yes..I am posting this on Sunday..but from now on, it really will be on Mondays. I need to test out how this is going to look published. Had to re-size photos and font.


My source for butter is Molly the milk cow, a Jersey/Guernsey cross. At the present time Molly is on a non-milking vacation, building up energy for both her and her unborn calf who is due to be born mid-July. When she is at her peak lactation (giving milk) she produces about 4 gallons of milk a day. I milk by hand - love it! I strain the milk through a muslin cloth into gallon jars then refrigerate overnight. By morning, the cream will have risen to the top of the jar. Jerseys are high butterfat producers so I typically get over one quart of cream from one gallon of milk. I skim it off using a soup ladle. I usually make butter with two quarts of cream. I leave it out on the counter for a couple of hours to warm to room temperature. Over the years of having milk cows, I have found the fastest and easiest way to make butter is with my Kitchen Aid mixer using the whisk attachment. I turn it on about medium so it won't splash out.

At first it makes whipped cream - I sometimes take some out at that point for dessert toppings. Soon you can start to see yellow globs forming and within just a few minutes it will all ball up together. It takes about 10-15 minutes for this to happen. I then scoop out the butter with a slotted spoon - what's left is buttermilk! I wash the ball of butter with cold water, smashing it around in a bowl with a wooden paddle to get out all the milk, repeating several times until the water is clear. I then add a little salt and store it in glass jars in the fridge or freezer.

Summer butter is WAY more yellow compared to winter butter because of
the beta-carotene in the grass that the cows eat. While they are on green pasture in the spring, you see a deeper yellow color. During the winter, while they are inside, the butter becomes a paler shade.

I was thinking that it would be fun to do a Molly/baby countdown as her calving time gets closer - with pictures! What do you think?

Marcia

Saturday, May 22, 2010

Sundays with Marlena Spieler-Tzimmes, a "Big Deal"

Tzimmes was the perfect side to organic turkey thighs and stuffing.
It paired well with a nice sauv.blanc...Kim Crawford from Austrailia
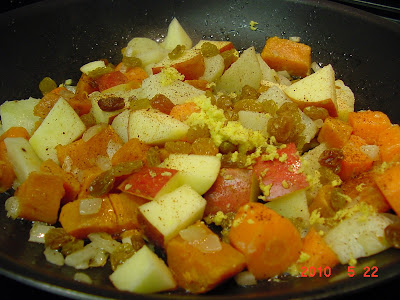
I didn't have dried apricots or prunes, but did have fuji apples and golden raisins!

How many people have "rendered chicken fat" in their fridge? Me, me! Love the schmaltz.
Ginger and onions....a perfect pairing.
The final dish....perfection in a bowl!

Ingredients: Serves 6

1 large carrot peeled and sliced into 1/2 inch chunks
1 sweet potato peeled and sliced into 1/2 inch chunks
1 med waxy potato peeled and sliced into 1/2 inch chunks
2 TBLS rendered chicken fat or veggie oil
1 med. chopped onion
1 handful of golden raisins
1 chopped Fuji apple
1-2 tsp grated fresh ginger
1 cinnamon stick or 2-3 shakes of ground cinnamon (I used a cinnamon grater)
juice of 1/2 lemon
a pinch of sugar and salt for the water

{Marlena called for dried apricots and pitted prunes as well}

Boil 2 qts of water with a pinch of salt and sugar added. Add your chopped carrots, sweet potato, and potato and cook until just barely tender. Strain veggies out and cool on platter. Reserve the liquid in the pan.

Heat the chicken fat or butter in a 12 inch skillet (med heat) and add the onions. Cook for about 3 minutes. Add your boiled veggies. Cover with enough liquid to just cover them...and now add the remaining ingredients.

Cover pan and turn heat down to med low. Check to see if pan requires more liquid. This will take about 25 minutes. The last 5 minutes of cooking, remove lid and sprinkle on a pinch of cinnamon. The liquid should be completely consumed by the ingredients.

note: you can bake this dish in an oven safe covered container on 325 for 35 minutes. check to see if liquid is needed midway through.

This was a perfect side dish this time around. You can add braised meat to it and make it a main dish. I had some leftover tri-tip in the fridge that I almost added the last 10 minutes of cooking...but then decided not to. But you could!

I don't know if Eileen and Shankari are finished with their Jewish Cooking Recipes..but go check anyway! Just the Two of us and Sacramento Spice.

You will notice a contributor to my blog on Monday. It will be Mondays with Marcia Lowry and will include her slant on ranch life in Wyoming. She is a high school buddy of mine and she is an amazing woman. She makes butter from her own cows, she has sheep, pigs, chickens, little lambs, and a huge garden. She makes everything from scratch! She lives with her handsome partner on her grandparents homestead near Crowheart, Wyoming....not too far from the Teton Mountains. I am looking forward to it!

Also..check back each Wed. for an update on the Camembert cheese I made in class today. I'll be eating it in about 3 weeks. I'll keep you posted...as I must take good care of it until then. Check out Many Moons Cheese....Sacha was a great instructor today!

Here is another link to someone who cut the cheese with Sacha!

Thursday, May 20, 2010

The Reluctant Blogger


Wednesday, May 19, 2010

Great Blog...Noms Not Bombs

And I found this on the blog. Would have been great during passover!

Bravo to Noms Not Bombs.

More Stuff I Really Like

This stuff is like crack...but, won't be eating it anymore!
My brother John took this photo of the tracks near Laurel, MT. I love it.
Stanley just chillin'....hoping Budding doesn't hop on him any second!
Kira O'Donnell pies. This was last weeks strawberry/rhubarb. Look at that crust!
My potatoes are growing like weeds...I can hear them under there. We'll be making potato salad from them by July 4th.

Saturday, May 15, 2010

Sundays with Marlena Spieler-Preserve .Pickle it.

Instant (almost) Sephardi Pickle of Mixed Veggies...and turmeric for this one!
Kosher Dill/Garlic Pickled Cukes, carrots, turnips
Maybe someone will pickle me when the time comes?


Well, I pickled the hell out of all kinds of stuff per Marlena Spieler's Jewish Heritage Cookbook...or the later version "Jewish Cooking". I love to can, to preserve...I grew up with a mom who preserved everything. She grew up with acres of fresh veggies...but that is another story.


I pickled everything: cauliflower, carrots, turnips, celery, red bell peppers, garlic and Mediterranean cucumbers. I made one jar with the cauliflower, carrots, red bell peppers, and 1/2 tsp of turmeric.

Be sure to check out Eileen and Shankari's blogs for their offerings...although they might be finished with Marlena's cookbook by now. Go check it out!
  • Pickle it recipe: for 2 lg jars, 16 oz (divide ingredients for each jar)
  • 2 1/2 quarts of water --for both jars
  • 3/4 cup kosher salt--for the water
  • four bunches of baby dill
  • 12 garlic cloves (unpeeled)
  • 2 TBSP pickling spices
  • 2 tsp hot pepper flakes (or 1/2 hot pepper per jar)
  • 1 TBSP dill seeds
  • 1 TSP turmeric-- for jar with cauliflower
  • 4 cardamom pods (my addition)
  • 2 sterilized 16 oz jars and lids.
Bring the water to a boil and add the kosher salt. Take from heat and let cool.

While that is going on, lightly crush each garlic cloves. Leave peels on. Wash your veggies and cut according to the size of the jar. I got the mediterranean cukes so didn't have to cut them. Peel your carrots.

Layer in the veggies, garlic cloves, spices, and baby dill. Pack two jars...16 oz each. Then pour the cooled brine over the mixture..making sure everything is covered. Put lid on and let sit for 7-14 days prior to chowing down. NOTE: Store in the fridge after they sit at room temp for several days. Be sure to go over and check out my blogger buddies and what is up with their Jewish Cooking recipes for this week. Just the Two of us and Sacramento Spice.
  • Enjoy!

Tuesday, May 11, 2010

Quinoa Pasta with Shrimp and that turnip salad dressing!!

Quinoa is a whole protein pasta..no cholesterol, no gluten, very low sodium and it does not taste like cardboard! It tastes like pasta! Do not overcook it.
I poached the shrimp in saffron and lemon water.

The recipe for the turnip salad dressing is in the previous post. This is a cold pasta entree. I did cut the turnips into smaller pieces..along with the cukes. The dill gives it a very fresh taste. A perfect dish on a summer day...or any day for that matter.

Note: I removed the saffron threads with a fork prior to draining the pasta. After draining, run cold water over the pasta. Shake colander and then add a TBSP of olive oil and stir so pasta won't stick together.

Sunday, May 09, 2010

Sundays with Marlena Spieler-Turnip ON! Two Recipes.

Torshi is a Jewish Persian Pickled Condiment made with young turnips and beets.
This turnip and sour cream Ashkenazi salad is a perfect choice to accompany a dairy meal. I added the Greek Yogurt...I couldn't help myself. I used the sauce over cold quinoa pasta...a later post!
I also used some preserved lemons in the salad...I knew Marlena would approve!

It would be great with flatbread...but this garlic/parm artisan bread was perfect with it.


Torshi

Ingredients: for four jars, 12 oz each

2 and 1/4 lbs of turnips (smallish ones)
3 raw beets (small to med)
2-3 TBS kosher salt
6 cups of water
juice of 1 lemon

Wash the turnips and beets. Do NOT peel them. Cut off the "hairy" end though. :)
Cut into 1/4 " slices. Put salt and water into a bowl. Stir and leave until salt is dissolved.

Sprinkle the beets with lemon juice and place the slices at the bottom of the sterilized jars. Top with the turnip slices..pack them tightly into each jar. Pour the salt water into each jar until it tops the beets and turnips. Seal the jars and put into a cool place for at least 7 days before serving. Great in a sandwich...or just to crunch on! I cannot wait until they are ready!

Turnip Salad in Sour Cream and Greek-style Yogurt

Ingredients: Serves four

2-4 smaller turnips (young ones) clean them with a brush
1/4 to 1/2 red onion...grated or finely chopped
2-3 drops of white wine vinegar
(I finely chopped 1 quarter of a preserved meyer lemon)
Salt and ground black pepper to taste
Chopped fresh parsley or paprika for garnish (I used the green parts of scallions)

Thinly slice on or two of the turnips..and then grate the rest on med hole of the grater. Place in a bowl.

Add the onion, vinegar, salt and pepper and toss. Stir in the sour cream (and yogurt and preserved lemons..or even grate some lemon into the bowl)

Chill and serve with a garnish of parsley or some other green herb, etc. Dill?

This is killer! A killer salad. I put it in some pita bread and it was so good...I even thought of all kinds of things that this would go with..or just by itself. A real summer kind of salad! Later I added some cukes and dill...and put it over cold pasta with shrimp I poached in water with lemon and saffron. Later on that!

So, we continue to cook thru Jewish Cooking and my compadres are almost done! Please be sure to check out Just the Two of Us and Sacramento Spice for their offerings this week. Oh..and Happy Mother's Day!!

Saturday, May 01, 2010

Sundays with Marlena Spieler-Pollo All'Ebraica with Baby Peas and Deep Fried Baby Artichokes

Oh...I forgot to spoon the sauce over before I took the photo. My battery was so low..in a hurry I guess.
Deep-fried artichokes are divine.


As Marlena says, this is an Italian dish that reflects both Mediterranean and Jewish Cooking. Due to the laws of the Kashrut, which forbids using cream with meat dishes, Jews enrich sauces by using egg yolks. That being said, I did not temper my egg yolks appropriately so my sauce ended up going down the toilet. My cat Buddy loves to watch things go down the toilet...at least HE was happy! Live and learn.

We were starving so I ended up using the cooked onions along with the juices from cooking the half chicken ....so with the fennel seeds, parsley, the Marsala and some chicken stock...the sauce was delicious.

Those deep fried baby artichokes are to die for! Seriously. The leaves were crispy but the heart was tender and perfecto...a little sea salt and voile! Here are the recipes for both dishes:

Pollo All'Ebraica with Baby (Petite) Peas

[I used half a chicken..already split. Marlena called for 4 boneless, skinless chicken breasts..which I didn't have]. BTW..All'Ebraica means "in the Jewish style"

Ingredients: Serves 4

4 boneless and skinless chicken breasts
all-purpose flour for dusting chicken...about 1/4 cup
4 TBS Canola Oil
1 finely chopped onion
1 TBS chopped fresh parsley (I used pea shoots)
1 and 1/2 tsp fennel seeds
5 TBS dry Marsala
1/2 cup chicken stock
2 cups baby peas (I used the steam in a bag kind)
juice of 1 and 1/2 lemons (I used half of a preserved meyer lemon..finely chopped)
2 egg yolks
salt and ground black pepper to taste

Salt and pepper the chicken and then dust with flower. I just threw mine into a paper bag that I had added the flour to...shake a few time. Throw the bag away.

Heat 1 TBS in pan and add the onion, parsley, fennel seeds. Saute for about 5 minutes. Remove from pan and set aside.

Add the remaining oil and add the chicken to the pan..cook 2 or 3 minutes on each side until lightly browned. Take chicken out and set aside. De glaze pan with the Marsala and reduce liquid to about 2 TBS and add chicken stock. Go ahead and add the onion mixture, chicken, and peas back into the pan. Everyone in the pool....like they say way too often on tv.

Cook that over low heat while you prepare the egg mixture. Now, in a bowl, beat the lemon juice and egg yolks together. Slowly add about 1/2 cup of the liquid from the pan into the yolk mixture and combine.

Return the mixture to the pan and stir together with the other liquid. Don't allow mixture to boil or the eggs will scramble...honest. Serve immediately with sauce and peas spooned around the chicken. I had some leftover brown rice..so served some of that too. You will be loved.

Deep-Fried Baby Artichokes

Ingredients: Serves 4

2- lemons, halved
4-8 small globe artichokes
Vegetable oil for frying (or a mixture of peanut oil and canola oil for a higher smoke point)
pinch of sea salt

Prepare a big bowl with cold water and squeeze the lemon juice into the water...artichokes oxidize quickly! After you pick the tough outer leaves off, put them in the aciduated water until ready to cook. They get fried anyway so I skipped this step. I am bad.

Cut the stems off and then take the outer tough leaves off..until you get down to the pale inner leaves. Cut a bit of the tops off too.

Carefully open the leaves. I didn't worry about the choke, as these were very small artichokes. If there is a lot of choke, remove it with a small spoon. If the artichokes are not babies, you should cook them in boiling water for about ten minutes before deep frying...and then make sure you roll them in a clean kitchen towel to get that water out. Gently. Then place upside down on counter and carefully press down so leaves open up.

Fill a heavy wok or pan with the oil...or as much as you think you'll need to deep fry. I only used about 2 cups or so. I threw a leaf in to see if the oil was hot enough. When it is...put artichokes in 2 at a time...leaves up, and press down with stainless steel slotted spoon. When they are browned, drain on paper towels or a clean kitchen towel. Sprinkle with sea salt and serve! Dave loved these and so did I! Wowza.


I counted and I have 21 more recipes out of Jewish Cooking to complete. Eileen says she has three left, but she has been posting more than one per week. Shankari...how many do you have left? Be sure and click on their names to check out what they cooked up for Sunday!